As a business owner, a big part of expanding your business and making it successful is your online presence. Having your own website can mean the difference between reaching a local customer base and reaching a worldwide one. Taking your business online helps you by helping your customers. Who doesn’t prefer the convenience of learning about a business with the click of a button? If you think it’s difficult or expensive, think again! You can learn to build your own website in a few easy steps. After that, you can take your website online with the help of a web hosting service. That’s not all! We won’t leave you hanging.
You can learn more about web hosting and other tutorials regarding managing your website right here! First, things first, what exactly is the host file?
Table of Contents
What is the host file?
The host file is used to link domain names to IP addresses that are not available on the world wide web. It can be found on any operating system and is the first place the computer system looks when you enter a website URL into your browser.
As a website owner, being able to locate and edit this file is very important. There are many things you can do with the host file on Windows 10, but the purpose for which you, the website owner, might find it most useful, is to test your new website before it goes live on the world wide web.
When you purchase a new domain name, or you are looking to transfer your existing website to a new server, it may take a while for the changes to be made on the world wide web. As a result, entering your website address during this time will result in an error on your browser. As a temporary way to avoid this, you can edit the host file to link the IP address of your website server to the domain name of your website.
You can learn more about what you can do with the host file here. If you find that you need to edit or reset your host file in Windows 10, follow these steps.
Structure of the host file
When you first open the host file with no previous knowledge of how it works, things might be a little confusing. The first thing that might catch your eye is a number of lines beginning with a hash symbol (#). This symbol identifies that line as a comment, and information about the file. Comments are for the user’s benefit and are ignored at run time. Each valid record in the file is entered in the format: [IP Address] (white space) [hostname]. The white space is usually a tab space.
5 Steps to edit the host file
The location of your host file may vary depending on the operating system you use. In this tutorial, you will learn how to edit the host file in Windows 10. Please, bear in mind that you need administrative privileges to edit the host file. It is also recommended that you keep a backup of your host file before editing it. To do so, use your file explorer to navigate to C:\Windows\System32\drivers\etc\ locate the file named “hosts”, create a copy, and name it something that identifies it as the backup such as “hosts-backup.”
To edit the host file in Windows 10, follow these steps:
- Start by running your preferred text editor application as an administrator. We use Notepad, so find Notepad in the start menu, right click on the icon, and click Run as Administrator. Click Yes when prompted.
- When Notepad opens up, select File followed by Open in the menu bar. Navigate to the folder containing the host file: C:\Windows\System32\drivers\etc\ at which point you will select hosts and click
- At the end of the file you will add the IP Address and the domain name of your website, after which you will save and close the file by closing Notepad.
- Before you can go searching, you need to flush your DNS cache. Do this by opening Command Prompt with Administrative privileges.
- When Command Prompt is open, type the following command and press enter:
Ipconfig /flushdns
Once that process is finished, you will be able to access your website by typing it in your favourite browser. This process does not bring your website live on the web, which means others will not be able to access your website from their devices until it is made live by your hosting service.
5 Steps to reset your hosts file
If you backed up your Windows 10 host file before you edited it the first time! Resetting your host file in these conditions simply requires that you rename the backed-up host file to its original name (hosts) and delete the edited host file. If you didn’t backup your host file before editing it, the resetting process is still easy, but a little longer:
- Open up your preferred text editor such as Notepad
- Copy the text below, and paste it into the file:
# Copyright (c) 1993-2006 Microsoft Corp.
#
# This is a sample HOSTS file used by Microsoft TCP/IP for Windows.
#
# This file contains the mappings of IP addresses to host names. Each
# entry should be kept on an individual line. The IP address should
# be placed in the first column followed by the corresponding host name.
# The IP address and the host name should be separated by at least one
# space.
#
# Additionally, comments (such as these) may be inserted on individual
# lines or following the machine name denoted by a '#' symbol.
#
# For example:
#
#      102.54.94.97     rhino.acme.com          # source server
#       38.25.63.10     x.acme.com              # x client host
# localhost name resolution is handle within DNS itself.
#       127.0.0.1       localhost
#       ::1             localhost
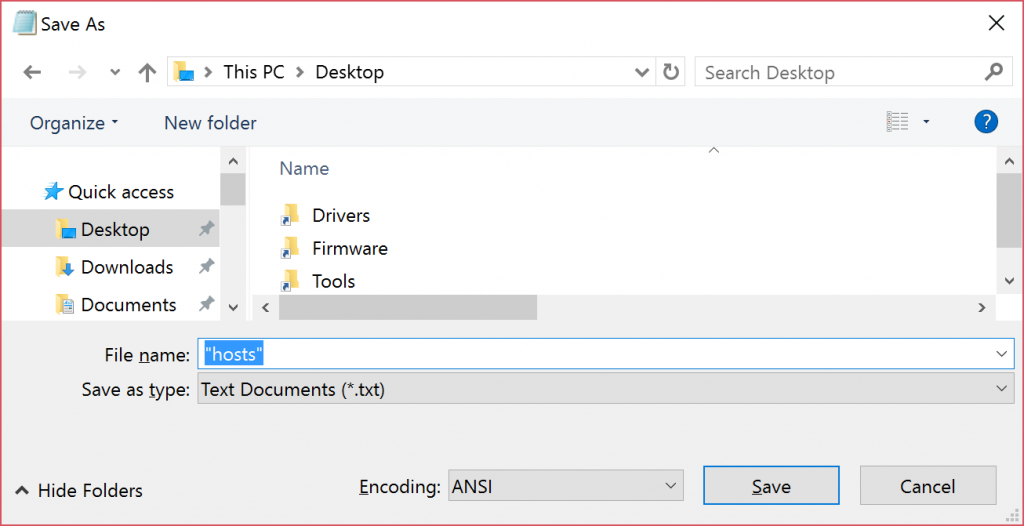
- Save the file as hosts on the desktop and close Notepad.

Image source: https://support.microsoft.com/en-us/help/ - Navigate to C:\Windows\System32\drivers\etc\ using your file explorer and rename the edited host as “hosts.old”.
- Copy or move the host file you just created from the desktop to the C:\Windows\System32\drivers\etc\
There you go! You have successfully reset your Windows 10 host file.
Conclusion
It is that simple to edit or reset your host file on windows 10. The steps outlined for editing and resetting your host file in Windows 10 can be very helpful. The Windows 10 host file is in important part of the operating system and should not be edited without the proper knowledge of how to correct your changes. Be sure to make changes only when necessary; and if you are facing connectivity issues, it might be a good idea to check that your changes to the host file are not the reason for them.
