Internet trends continue to evolve at a rapid pace. In order to stay competitive online you have to, not only keep up with your competitors but to ensure your self-hosted WordPress website reflects your brand’s focus and visibility. One way to increase your visibility online is to rank high in search engines like Google, Yahoo and Bing. SEO a buzz acronym you’ve probably heard about, especially if you’ve been churning out evergreen content for your website.
An SEO hack to help drive more traffic to your website is to make custom permalinks for your pages, posts and other post types.
In this article, we’ll give tips of editing your custom permalinks in WordPress without negatively affecting your SEO, in fact, you’ll boost it.
Let’s dive right in.
Table of Contents
What’s a Permalink?
Your blog posts, pages and other archive pages on your WordPress site have permalinks which are permanent URLs. A custom permalink is simply a custom URL applied to specific pages in WordPress without affecting your core URL structure.
WordPress has a built-in SEO friendly URL structure in place which gives you the freedom to use an easy to understand structure for both humans and search engines.
WordPress comes with an SEO Friendly URL structure which allows you to use an easy to understand URL structure for both humans and search engines.
For example, https://yourwebsite.com/blog/sell-on-facebook/
This works better than URLs from the past: https://yourwebsite.com/index.php?p=4556
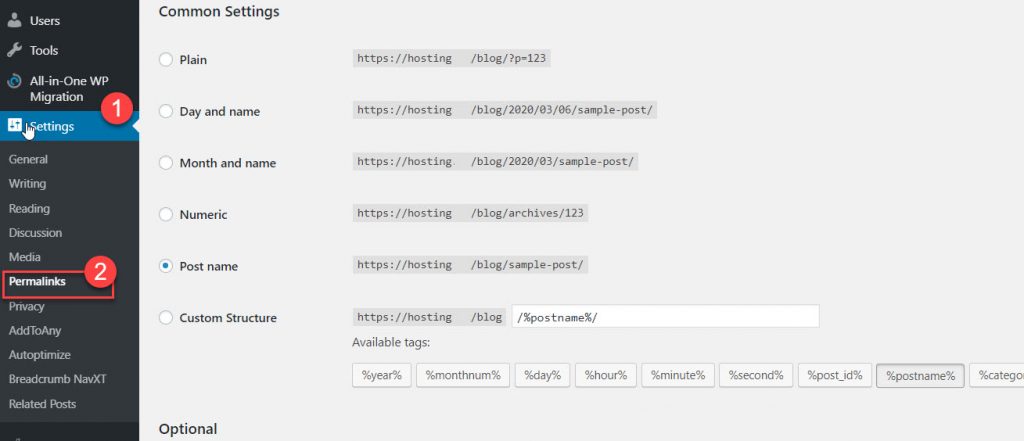
WordPress offers website owners multiple options to choose from. You can view them in Settings » Permalinks page.
Apart from changing the core permalink structure, WordPress also offers ways to customise the individual URLs of posts, pages, categories, and tags of your website.
Alternatively, you can use WordPress plugins to create custom permalinks for specific sections of your website that overrides the default WordPress settings.
Let’s explore all the options. We’ll start with the default built-in options that come with your WordPress website dashboard.
How to Change the WordPress Permalink Structure
When you want to change your entire URL structure for your website, then go to Settings » Permalinks page.

Choose your permalink settings
Merely select a URL structure for each specific post. Otherwise, you can also use the tags shown on the screen to create a custom structure for your WordPress URLs.
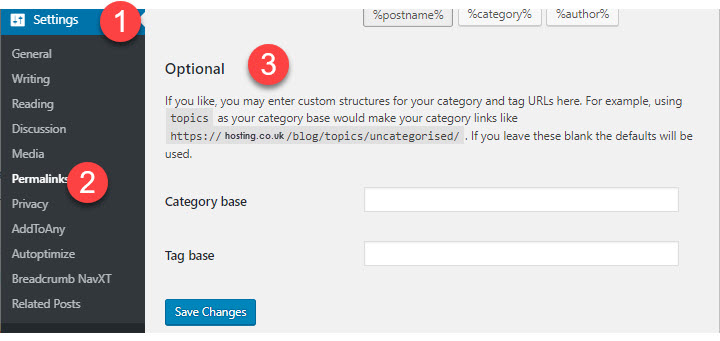
Click on the Save Changes button to store your changes so you don’t lose your new permalink.
We recommend using a URL structure which includes the post name in the URL. This ensures your URLs are SEO friendly and meaningful.
Note: You should shift to an SEO friendly permalink for all new WordPress blog posts and websites. However, if you have an existing website that’s already getting good traffic from search engines, then changing permalinks can negatively affect your SEO rankings.
How to Modify Category and Tag URL Prefixes in WordPress
By default, WordPress uses /category/ as the base for your category URLs and /tag/ for the tagged pages. For example:

You can alter these base prefixes in Settings » Permalinks page to whatever you like. For example,
https://yourwebsite.com/topics/technology/ (for category pages)
https://yourwebsite.com/hashtag/hosting (for tag pages)
Steps to Change Individual WordPress Posts or Pages URLs
After setting up your permalink structure, WordPress uses it as a template for all the links on your website. However, the option is there to modify the URL slug or keywords inside the URL structure for all of your individual posts, pages and custom post types.
Customising the slug part of your URL can be done from the post edit screen right inside toe WordPress content editor.
Edit the post, page, or custom post type and click on the title field—you’ll notice the permalink field appears at the top.

Just click on the edit button next to it, and change the URL slug to a custom permalink. Then click on the save button to store the new permalink.
Changing your WordPress Category or Tag URL
Earlier we explained how to modify the category and tag base prefix in WordPress, now, here’s how to change the URL keywords for an individual category or tag.
- To do this Go to Posts » Categories page and select the edit link below the category you want to customise.
- WordPress should now load the category details. Now, you can alter the category slug to customise its permalink.
Likewise, you can edit separate tags by visiting Posts » Tags page.
Additionally, you can also edit any custom classifications using the same method.
Steps to Change Author Page URLs in WordPress
WordPress automatically creates the ‘/author/’ base to URLs leading to author archive pages.
The problem is WordPress doesn’t have an option to alter the author URL base or the slug.
Fortunately, there is a plugin that can help. Just install and activate the Edit Author Slug .
Once activation is complete, go to Users » All Users page. Next, select ‘Edit’ link below a username.
On the following page, scroll down to the Edit Author Slug section, and you’ll be able to select an author slug or add your own. Don’t forget to click on the save changes button to store your settings.
If you wish to modify the author permalink base, then go to the Settings » Edit Author Slug page.
Here you’re given an option to change the author base and even select different author bases for users with different user roles.
How to Create Completely Custom Permalinks in WordPress
All the aforementioned methods permit you to modify WordPress permalinks to a certain extent. However, they don’t enable you to create totally custom permalinks. The reason for this is that WordPress didn’t design for this functionality.
But if this is what you’re looking to do, then, lucky for you, there’s a plugin for that. To override the default WordPress URL structure to make custom sections on your website, these are the steps to follow.
Step 1: Install and active the plugin Custom Permalinks.
Step 2: Once activated, you need to modify the post you want to create a custom permalink for—as an alternative to editing the permalink field at the top, there is an option to create a custom permalink before the editor.
Likewise, creating custom permalinks for categories is also available to you. Go to Posts » Categories page and select edit link, below the category that you want to alter.
On the category details page, you’ll find the option to create a custom permalink for that particular category. You’re also given the option to create a URL without the category base prefix.
You have the option to manage and disable all your custom permalinks by selecting the ‘Custom Permalinks’ menu in the admin sidebar.
Merely select the custom permalinks you wish to delete and then click on the Bulk Actions menu to select the ‘Delete permalinks’ option.
Then click on the ‘Apply’ button and the plugin does the work to remove those custom permalinks. The deleted permalink will be swapped by the default WordPress permalink scheme.
How to Setup Permalink Redirects and Avoid 404 Errors
WordPress automatically handles any changes made to post and page URLs.
Though, it may not set up redirects for your custom author permalinks or entirely customised permalinks. In the event of that happening, you’ll need to set up proper redirects to avoid 404 errors on your website.
First, you need to install and activate the Redirection plugin.
Once activated you visit Tools » Redirection page to set up your redirects. Simply add the old link in the ‘Source URL’ field and the new URL in the ‘Target URL’ field.
Once you’re done click on ‘Add Redirect’ to save your changes. And voila you’re done!
Hope this article answered all of your custom permalink questions for WordPress.
